Your cart is currently empty!
Tag: GUI
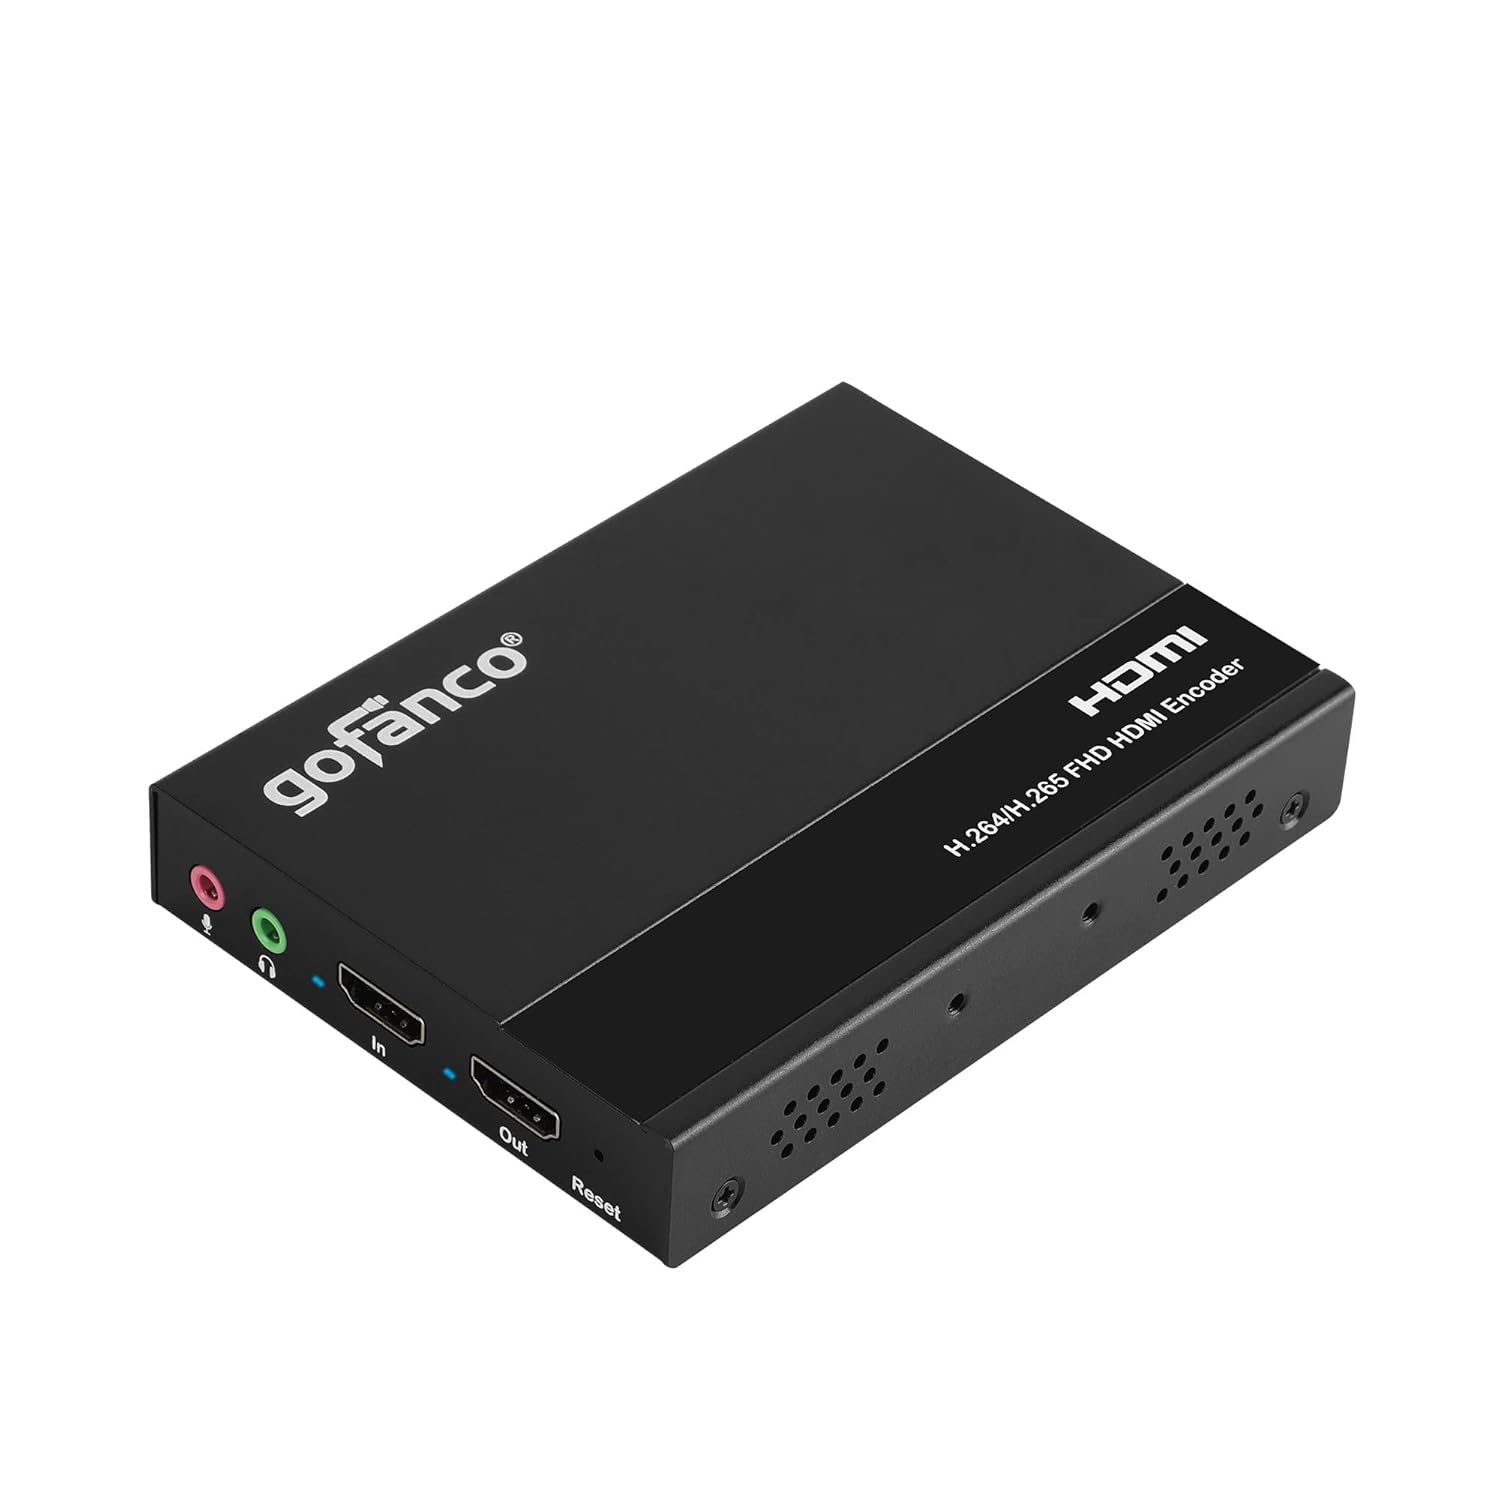
gofanco H.265 H.264 HDMI IPTV Encoder – 1080p @60Hz, Loopout, Audio Extraction/Embedding, GUI, Live Stream/Broadcast YouTube, Facebook, Twitch, VLC Software, RTSP, RTMP, RTMPS, HLS, Multicast
Price: $174.99
(as of Dec 15,2024 17:06:54 UTC – Details)
About gofanco
Product Dimensions : 4.88 x 0.83 x 3.54 inches; 10.56 ounces
Item model number : HDIPTV265
Date First Available : February 28, 2022
Manufacturer : gofanco
ASIN : B09TMXZCBBHDMI VIDEO IP ENCODER – Ideal for audio/video broadcast or live stream to popular platforms like Youtube, Facebook, Twitch, and others. Works with VLC, OBS, vMix software and etc. Supports up to 1080p @60Hz
VIDEO/AUDIO DECODING: H.265 mainstream, H.264 basic, mainstream and advanced quality, MJPEG/JPEG basic quality, AAC, AAC+, AAC++
SUPPORTED PROTOCOLS – Supports RTSP, RTMP, RTMPS, HLS, and Multicast
ADVANCED FEATURES – HDMI Loopout, audio extraction and embedded, user-friendly web GUI control, RS232 control
SIMPLE INSTALLATION – Surface mountable metal housing provides durability and higher level of RF/EMI shielding; FCC, CE & RoHS compliant. Our products are backed with a 1-year limited warranty and experienced tech support team in Silicon Valley. If you have any questions or concerns, visit our gofanco website or click on our name in the buy box and select “Ask a Question”
Introducing the gofanco H.265 H.264 HDMI IPTV Encoder – Your Ultimate Solution for Live Streaming and Broadcasting!Are you looking for a reliable and professional-grade HDMI IPTV encoder that can handle high-quality video streaming and broadcasting? Look no further than the gofanco H.265 H.264 HDMI IPTV Encoder!
This powerful encoder is capable of streaming in stunning 1080p resolution at 60Hz, ensuring crystal-clear video quality for your viewers. With features like loopout, audio extraction/embedding, and a user-friendly GUI interface, setting up and managing your live streams has never been easier.
Whether you’re looking to broadcast on popular platforms like YouTube, Facebook, Twitch, or VLC Software, this encoder has you covered. It supports a wide range of streaming protocols including RTSP, RTMP, RTMPS, HLS, and multicast, giving you the flexibility to stream to multiple platforms simultaneously.
Don’t settle for subpar streaming quality – upgrade to the gofanco H.265 H.264 HDMI IPTV Encoder and take your live streaming and broadcasting to the next level!
#gofanco #H.265 #H.264 #HDMI #IPTV #Encoder #1080p #60Hz #Loopout #Audio #ExtractionEmbedding #GUI #Live #StreamBroadcast #YouTube #Facebook #Twitch #VLC #Software #RTSP #RTMP #RTMPS #HLS #Multicast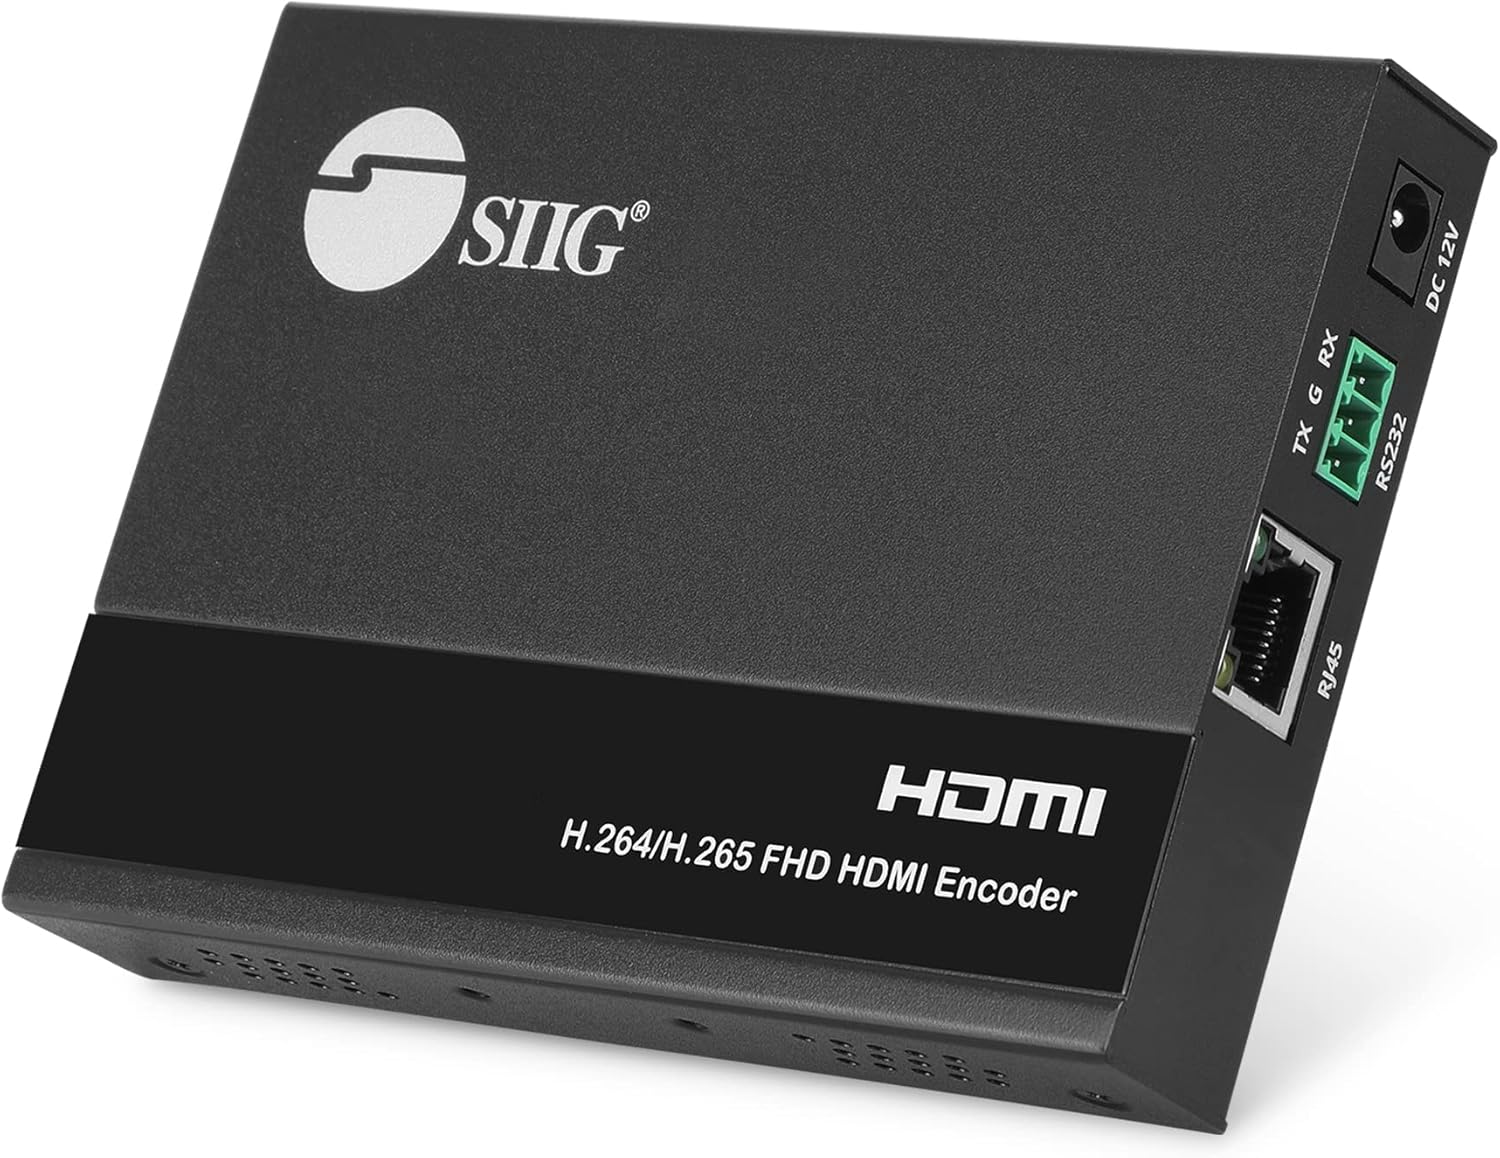
SIIG H.265 H.264 HDMI IPTV Encoder 1080p 60Hz, Loopout, Audio Extraction/Embedding, GUI, Live Stream/Broadcast to YouTube, Facebook, Twitch, VLC Software, etc, RTSP, RTMP, RTMPS, HLS, Multicast
Price: $209.83
(as of Dec 15,2024 16:24:44 UTC – Details)
Product Description


SIIG HDMI 1080p Live Streaming Video H.264 or H.265 IPTV Box Encoder with Loop-Out (CE-H27511-S1)
IPTV stands for Internet Protocol Television, which uses Internet technology to broadcast video content, compared to traditional broadcast television, viewers are no longer limited by a predetermined schedule, and they can decide what they want to watch and when they want to watch it. IPTV encoders play an important role in the process of distributing video content to viewers online. If your business depends on IPTV and video streaming, having a high-quality encoder is a valuable investment that will help you stream and view video content online. SIIG’s HDMI 1080p IPTV Encoder (CE-H27511-S1) is designed for both amateurs and professionals.
Features
Multiple Video Codings – This IPTV encoder supports multiple video coding, such as the basic H.264, the mainstream H.265, and MJPEG/ JPEG quality.
Full HD Resolution with Loop-Out – The HDMI In supports resolution at maximum code rate up to 1080p 60Hz 4:4:4 8 bit, plus one HDMI video loop-out, so you can connect to another display to monitor the video content which is broadcasted.
For Multiple Protocols & Platforms – It supports RTSP(Real Time Streaming Protocol), HLS (HTTP Live Streaming) / RTMP (Real Time Messaging Protocol), RTP (Real-Time Transport Protocol), UDP (User Datagram Protocol), and mainstream video platforms, such as Facebook, YouTube, Twitch and many more.
Advanced Setting – This encoder supports CBR (constant bitrate) and VBR (variable bitrate) encoding for broadcasters to choose from to determine the quality of their streams. The maximum code rate is up to 40Mbps (The main code stream is 40M, and the Sub-code steams is 8M).
Connections & Applications
Distributing IPTV content takes several steps and devices. First, there is the video source, such as a broadcast camera, DSLR, streaming box, media player, or computer. Video recorded by a camera is uncompressed, so the file size is huge making video distribution over the Internet not feasible.
Second, this is where the IPTV encoder comes into play. It takes the video content from the video source, whether it’s a live recording or an uncompressed pre-recorded video file, then encodes it for broadcasting over the Internet.
Third, once the video is encoded, it is usually stored on a web server, or uploaded to Live Platforms, such as Facebook, Youtube, Twitch, Ustream, etc.

User-Friendly Web Browser Based GUI Control
SIIG’s CE-H27511-S1 encoder comes with user-friendly GUI control for different settings, such as encoding, audio, OSD, and system setting. The web browser-based interface allows users to easily adjust the setting to customize their video and audio streaming preparation. Please refer to the user manual for further details.

siig hdmi 1080p live streaming video h.264 or h.265 iptv box encoder with loop-out
SIIG’s CE-H27511-S1 encoder comes with user-friendly GUI control for different settings, such as encoding, audio, OSD, and system setting. The web browser-based interface allows users to easily adjust the setting to customize their video and audio streaming preparation. Please refer to the user manual for further details.

Superb Audio Compatibility
SIIG’s CE-H27511-S1 encoder is compatible with multiple audio coding formats, such as AAC, AAC+, AAC++, AC3, MP2, and MP3. It also supports analog audio extraction and analog audio embedded.

Mainstream Platforms Supported
Once the video is encoded and compressed to more manageable file size and quality level, it is ready to be uploaded to a web server or a video streaming platform. Users would need to choose a video streaming protocol to deliver the video file, the file then has to be broken up into chunks to be sent to platforms and reassembled to viewers’ devices.
There are multiple video streaming protocols and SIIS’s CE-H27511-S1 supports those most preferred by broadcasters, such as RTSP(Real Time Streaming Protocol), HLS (HTTP Live Streaming) / RTMP (Real Time Messaging Protocol), RTP (Real-Time Transport Protocol), UDP (User Datagram Protocol).

What is in the Box?
HDMI Video H.264 H.265 IPTV Encoder with loopout Power adapter DC 12V/1A Mounting ears & Screw kit Phoenix plugs User manual
Powerful Streaming Partner – This IPTV encoder supports multiple video coding, such as the basic H.264, the mainstream H.265, and MJPEG/ JPEG quality. You can go live easily under the 1080p at 60Hz up to 4:4:4 8 bit of video resolution.
Support Multiple Protocols & Platforms – There are different video protocols and platforms to choose from when you want to broadcast the video content, so an IPTV encoder that supports multiple protocols and platforms is important. SIIG’s CE-H27511-S1 supports RTSP(Real Time Streaming Protocol), HLS (HTTP Live Streaming) / RTMP (Real Time Messaging Protocol), RTP (Real-Time Transport Protocol), UDP (User Datagram Protocol) and mainstream video platforms, such as Facebook, YouTube, Twitch.
Plug in Your Video Source and Go – No matter what your video sources are from as long as it is an HDMI interface, this IPTV encoder can help you go live on the web. The video source can be professional video cameras, TV streaming boxes, Blu-ray players, desktop PCs, or gaming consoles.
HDMI Loop-Out – One unique feature of this device is the HDMI video loop-out port, which allows an additional display to be connected to the encoder, so users can monitor the video that they are broadcasting.
Advanced Settings for Pros – For professional settings, this encoder supports CBR (constant bitrate) and VBR (variable bitrate) encoding for broadcasters to choose from to determine the quality of their streams. This is particularly important for broadcasters if it is for real-time live streaming or on-demand video transcoding.
Are you looking for a high-quality encoder for your live streaming needs? Look no further than the SIIG H.265 H.264 HDMI IPTV Encoder! This powerful encoder supports 1080p resolution at 60Hz, ensuring crisp and clear video quality.But that’s not all – this encoder also features loopout capability, audio extraction and embedding, a user-friendly GUI for easy setup and configuration, and the ability to live stream and broadcast to popular platforms like YouTube, Facebook, Twitch, and VLC Software.
With support for RTSP, RTMP, RTMPS, HLS, and multicast streaming protocols, the SIIG encoder offers flexibility and compatibility for a wide range of applications. Whether you’re a content creator, event producer, or corporate communicator, this encoder is a versatile and reliable solution for your live streaming needs.
Don’t settle for subpar video quality or unreliable streaming performance – invest in the SIIG H.265 H.264 HDMI IPTV Encoder and take your live streaming to the next level!
#SIIG #H.265 #H.264 #HDMI #IPTV #Encoder #1080p #60Hz #Loopout #Audio #ExtractionEmbedding #GUI #Live #StreamBroadcast #YouTube #Facebook #Twitch #VLC #Software #RTSP #RTMP #RTMPS #HLS #Multicast
Step by Step Tutorials on Deep Learning Using Scikit-Learn, Keras, and Tensorflow with Python GUI
Price: $9.99
(as of Dec 14,2024 14:55:47 UTC – Details)
ASIN : B093D3RTNM
Publisher : BALIGE PUBLISHING; 1st edition (April 23, 2021)
Publication date : April 23, 2021
Language : English
File size : 10203 KB
Text-to-Speech : Enabled
Screen Reader : Supported
Enhanced typesetting : Enabled
X-Ray : Not Enabled
Word Wise : Not Enabled
Print length : 565 pagesDeep learning is a powerful tool for solving complex problems in machine learning. In this tutorial, we will walk you through the steps to create your own deep learning models using popular Python libraries like Scikit-Learn, Keras, and Tensorflow. We will also show you how to build a graphical user interface (GUI) to interact with your models.
Step 1: Install the necessary libraries
First, make sure you have Python installed on your system. You can install the required libraries by running the following command:pip install scikit-learn keras tensorflow<br /> ```<br /> <br /> Step 2: Import the necessary modules<br /> Next, import the necessary modules in your Python script:<br /> <br /> ```python<br /> import numpy as np<br /> import pandas as pd<br /> from sklearn.model_selection import train_test_split<br /> from sklearn.preprocessing import StandardScaler<br /> from sklearn.metrics import accuracy_score<br /> from keras.models import Sequential<br /> from keras.layers import Dense<br /> from keras.optimizers import Adam<br /> import tensorflow as tf<br /> from tkinter import *<br /> ```<br /> <br /> Step 3: Load and preprocess the data<br /> Load your dataset using Pandas and preprocess it using Scikit-Learn:<br /> <br /> ```python<br /> data = pd.read_csv('data.csv')<br /> X = data.drop('target_variable', axis=1)<br /> y = data['target_variable']<br /> <br /> X_train, X_test, y_train, y_test = train_test_split(X, y, test_size=0.2, random_state=42)<br /> <br /> scaler = StandardScaler()<br /> X_train = scaler.fit_transform(X_train)<br /> X_test = scaler.transform(X_test)<br /> ```<br /> <br /> Step 4: Build your deep learning model<br /> Now, create a deep learning model using Keras:<br /> <br /> ```python<br /> model = Sequential()<br /> model.add(Dense(128, input_dim=X_train.shape[1], activation='relu'))<br /> model.add(Dense(64, activation='relu'))<br /> model.add(Dense(1, activation='sigmoid'))<br /> <br /> model.compile(optimizer=Adam(), loss='binary_crossentropy', metrics=['accuracy'])<br /> ```<br /> <br /> Step 5: Train and evaluate the model<br /> Train your model on the training data and evaluate it on the test data:<br /> <br /> ```python<br /> model.fit(X_train, y_train, epochs=10, batch_size=32)<br /> <br /> y_pred = model.predict(X_test)<br /> accuracy = accuracy_score(y_test, y_pred)<br /> print(f'Accuracy: {accuracy}')<br /> ```<br /> <br /> Step 6: Create a GUI for your model<br /> Finally, create a GUI using Tkinter to interact with your deep learning model:<br /> <br /> ```python<br /> root = Tk()<br /> root.title('Deep Learning GUI')<br /> <br /> # Add GUI elements here<br /> <br /> root.mainloop()<br /> ```<br /> <br /> That's it! You have now created a deep learning model using Scikit-Learn, Keras, and Tensorflow, and built a GUI to interact with it. Happy coding!#Step #Step #Tutorials #Deep #Learning #ScikitLearn #Keras #Tensorflow #Python #GUI
Hands-On Guide To IMAGE CLASSIFICATION Using Scikit-Learn, Keras, And TensorFlow with PYTHON GUI
Price: $9.99
(as of Dec 14,2024 02:26:03 UTC – Details)
ASIN : B095YZT8N4
Publisher : BALIGE PUBLISHING; 2nd edition (May 26, 2021)
Publication date : May 26, 2021
Language : English
File size : 7654 KB
Text-to-Speech : Enabled
Screen Reader : Supported
Enhanced typesetting : Enabled
X-Ray : Not Enabled
Word Wise : Not Enabled
Print length : 129 pages
Page numbers source ISBN : B0962FP7VN
In this hands-on guide, we will walk you through the process of image classification using popular Python libraries like Scikit-Learn, Keras, and TensorFlow. We will also create a graphical user interface (GUI) using Python to interact with our image classification model.First, we will start by loading a dataset of images that we want to classify. We will then preprocess the images and extract features using Scikit-Learn. Next, we will build a neural network model using Keras and train it on our dataset using TensorFlow as the backend.
After training our model, we will evaluate its performance on a separate test set of images. Finally, we will create a user-friendly GUI using Python libraries like Tkinter to allow users to upload their own images and get predictions from our trained model.
By the end of this guide, you will have a solid understanding of image classification techniques and how to implement them using popular Python libraries. So let’s get started on our journey to building an image classification model with a Python GUI!
#HandsOn #Guide #IMAGE #CLASSIFICATION #ScikitLearn #Keras #TensorFlow #PYTHON #GUI
